


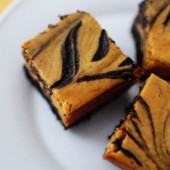
Pumpkin Spice Cheesecake Brownies
Fall has definitely arrived! With all the delicious soups, chili, and baking with apples and pumpkin, it’s by far the most fun food season. These bars have popped up all over the Internet after showing up in Cara’s blog two years ago. Hubby has been asking for these bars for about two weeks now. With the shortage of canned pumpkin going on right now, I couldn’t make these until now because I just couldn’t find canned pumpkin!

I made these when we had some overnight guests and everyone loved them. We got impatient and cut them after they had cooled for about a hour. They hadn’t been chilled so they were still a bit gooey and warm. They’re delicious at this point and also after they’ve been chilled (the pumpkin flavor really shines once they’ve chilled).
I made a few adjustments to Cara’s recipe. One of the bloggers who made these said she wished there was more of the pumpkin mixture, so I upped that part of the recipe. Cara’s original recipe called for 6 oz of cream cheese and since a block of cream cheese is 8 oz, I just adjusted the other ingredients of the cheesecake portion so that it would use a full block of cream cheese. My adjustments are shown below.

I also don’t tend to think of pumpkin and chocolate together. It seems to me that white chocolate or cream cheese frosting are natural partners with pumpkin. The more I thought about it, the more I thought that dark chocolate would pair with pumpkin better than milk chocolate. So in the brownie portion of these bars, I used some dark cocoa.


Pumpkin Spice Cheesecake Brownies
Yield: 16 bars
Ingredients:
For the Brownie Batter
3/4 cup butter, melted
1 cup sugar
1 tbsp pure vanilla extract
2 eggs
1/2 cup all purpose flour
1/2 cup dark cocoa powder
1/4 tsp salt
2 tsp cinnamon
For the Cheesecake Batter
8 oz cream cheese, softened
1 egg
1/2 cup sugar
2 Tbsp + 2 tsp flour
2/3 cup pumpkin puree
1/3 tsp pure vanilla
2/3 tsp cinnamon
1/3 tsp ground ginger
1/3 tsp ground cloves
Directions:
Preheat oven to 350F. Grease an 8x8" square metal baking pan.
Beat together melted butter, sugar, and vanilla, then beat in eggs one at a time. Combine dry ingredients and then gradually stir into butter mixture with a wooden spoon. In separate bowl, beat together cheesecake batter ingredients.
Spread about 2/3 of chocolate batter into prepared pan, and spoon cheesecake batter over. Dollop remaining brownie batter over cheesecake batter. Swirl the batters together by running a butter knife back and forth through the pan.
Bake for 40 minutes, or until center is set. Cool completely on wire rack and chill before cutting and serving.
Original Beantown Baker Recipe, inspired by Cara's Cravings


 I am Jen the Beantown Baker. Engineer by day and baking maven by night. Hubby serves as my #1 fan and official taste tester. We got hitched back in 2006. Barefoot. In the sand. With the waves crashing behind us. It was one of the best decisions we’ve ever made.


that cake is so beautiful, and sounds delicious!
Wow! Your pictures are amazing! I would love to sink my teeth into that cake right now!
Well…. you’ve done it again! Now, I simply have to add this to my Christmas Eve repetoire. It is fabulous! So many recipes….not enough time!
http://www.simplysweeter.blogspot.com
wow! this look unbelievable. I might have to conquer my fear of baking just for this.
Wow, that is stunning! Nice job!
Whoa..this looks beyond incredible…I dont think my sweet tooth will be satisfied ever without this!
I have to do this for Christmas dessert! Thanks for sharing!
C’est magnifique! Great job!!
Seriously, that looks downright sinful and gorgeous!!! Just amazing Jen!
wow, this is over the top 🙂 but totally worth it!! looks awesome!
What a great combination of flavors! I can almost smell the cake. Yum!!
STUNNING! Good job on this, I want a piece!
…great cake!!! and happy bday to Z!!! Hugs, ciao Flavia
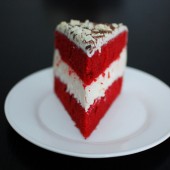
What am amazing cake! I love the bright red and contrasting white, simmply beautiful!
What a beautiful cake! My family would love this. Cheesecake and red velvet are my hubby’s favorites. Maybe I will make it for his birthday!
Talk about impressive! You go!
And just when I think you can’t keep coming up with brilliant ideas and delicious photos…this looks/sounds utterly amazing!
Cheesecake in between the cake layers… OMG. You so outdid yourself. That is amazing!
Wow. I saw a similar cheesecake but couldn’t fint a recipe so resolved to just make “plain ole red velvet cupcakes.” This looks so much better!
Oh My – this looks so amazing!
that looks awesome! I saw something similar in the Sam’s club add that I’ve been wanting to try but homemade would be even better
This cake looks so beautiful and I bet it tastes INCREDIBLE! I couldn’t print it out fast enough – I’m definitely trying it in the new year! Wow!
this has been on my ‘want to try’ list for a while! Maybe this will be the push i need to give it a try!
That cake looks gorgeous and delicious!
This is so cool! The only reason I like red velvet is the cream cheese frosting and this just takes it to a whole new level!
Wow, where to begin?! That bright red is gorgeous! The cheesecake hiding in the center sounds ridiculously delicious! Gorgeous photos too:)
this is a perfect holiday cake! great idea.
What a great idea! I love how the cheesecake layer looks so impressive sandwiched between the shockingly red red velvet layers!
Ok this looks amazing!
Hey girl, I am 100% sure I am going to make this for Christmas…it looks amazing! Just wondering…you used a 9″ springform pan for the cheesecake, right?
Joanne, Sorry for the delay, but yet, I used a springform pan for the cheesecake. I think that’s why it came out a tad bigger than the cake layers. Did you make it for Christmas? How did it turn out?
I made this for Christmas and it was absolutely AMAZING! My family really enjoyed it and I already have thoughts of the other cakes that would be incredible with a layer of cheesecake inbetween. What a great idea!
This looks amazing! I am making 60 red velvet cupcakes for my cousin’s homecoming. I used the red velvet recipe without the cheesecake…AMAZING! The best recipe I have found yet. Thanks, keep it up!