Peppermint Fudge Brownies

Does anyone else remember those York Peppermint Patty commercials from when we were younger? Where people would “feel the sensation” during random activities?

I’ve been feeling the sensation for the past couple of weeks thanks to some mini York Peppermint Patties that I’ve been storing in the fridge. They have been really hitting the spot as the temperature increases in Boston.

When I was brainstorming ideas of what to bring to our friends for a cookout last week, I reached into the fridge to grab one of these cool minty treats and it hit me. Brownies with York Peppermint Patties had to be an amazing treat.

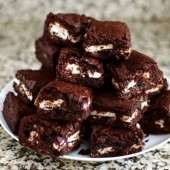
So I whipped up a batch of my favorite brownies, and added a layer of York Peppermint Patties in the middle. I packed as many of those little York Peppermint Patties into the pan as I could. The resulting brownie was minty, fudgey, and indulgent. They were a big hit at the cookout and taste even better slightly chilled.

Print Save

Peppermint Fudge Brownies

Mint and chocolate make such a great pair, it's no wonder these brownies were such a big hit!

Yield: 24 brownies

Ingredients:

1 cup (2 sticks) unsalted butter
2 1/4 cups sugar
1 1/4 cups cocoa
1 tsp salt
1 tsp baking powder
1 tsp espresso powder, optional
1 Tbsp vanilla
4 eggs
1 1/2 cups flour
2 cups chocolate chips
~1.5 lbs Mini York Peppermint Patties (~45 patties)

Directions:

Preheat the oven to 350°F. Lightly grease a 9" x 13" pan

In a saucepan set over low heat, melt the butter, then add the sugar and stir to combine. Return the mixture to the heat briefly, just until it's hot, but not bubbling; it'll become shiny looking as you stir it. Heating this mixture a second time will dissolve more of the sugar, which will yield a shiny top crust on your brownies.

Transfer the sugar mixture to a medium-sized mixing bowl, if you've heated it in a saucepan. Stir in the cocoa, salt, baking powder, espresso powder, and vanilla.

Whisk in the eggs, stirring until smooth.

Add the flour and chips, again stirring until smooth.

Spoon 1/2 of the batter into a lightly greased 9" x 13" pan. Top with peppermint patties - be sure to place the candies as close together as possible to ensure each bite has a bit of candy in it. Spoon remaining batter on top of candy.

Bake the brownies for about 30 minutes, until a cake tester inserted into the center comes out clean, or with just a few moist crumbs clinging to it. The brownies should feel set on the edges, and the center should look very moist, but not uncooked. Remove them from the oven and cool completely prior to cutting.

Recipe adapted from My Go-To Brownie Recipe

    Pin It

26 Responses to “Homemade Three Musketeer Candy Bars”

  1. #
    1
    How To Be Perfect — October 18, 2010 at 10:56 am

    This recipe looks fantastic, I would love to try it, any idea what I could use as a substitute for the frozen whipped topping? I think such a thing would be hard to find here, can I make it? x

  2. #
    2
    KV — October 18, 2010 at 12:14 pm

    wow that looks simple, and 3 muskateers are the “healthier” candy bar, right? hehe

  3. #
    3
    Fun and Fearless in Beantown — October 18, 2010 at 12:45 pm

    Um, why is this recipe so easy? This could be deadly in my kitchen!

  4. #
    4
    We Are Not Martha — October 18, 2010 at 1:10 pm

    These are SUCH a good idea!! Seriously, I’m super impressed! 🙂

    Sues

  5. #
    5
    amanda @ fake ginger — October 18, 2010 at 3:43 pm

    Who knew you could make 3 Musketeers?! I can’t wait to try this recipe!

  6. #
    6
    Megan — October 18, 2010 at 6:37 pm

    Wow! They look just like the real deal, and that recipe sounds way too easy. So dangerous!!

  7. #
    7
    becksterslaboratory — October 18, 2010 at 6:57 pm

    Oh my goodness…these look amazing! Nicely done : )

  8. #
    8
    Evan B — October 18, 2010 at 9:51 pm

    Homemade candy makes my feel not as guilty when I’m devouring a whole bunch 🙂

  9. #
    9
    The Small Boston Kitchen — October 19, 2010 at 12:07 am

    Seriously, you’re an amazing baker!! I would never think to make these at home. They look fantastic!

  10. #
    10
    Carly — October 19, 2010 at 12:18 am

    I was afraid to read through the whole recipe in fear I’d run straight to the kitchen. they look amazing

  11. #
    11
    theblogisthenewblack — October 19, 2010 at 11:59 am

    THis is my boyfriend’s favorite candy bar… I have to make these! 🙂

  12. #
    12
    Boston Food Diary — October 19, 2010 at 1:17 pm

    These sound amazing Jen! Super simple- yet incredibly indulgent and definitely would satisfy a sweet tooth…or two…

  13. #
    13
    Carolyn — October 19, 2010 at 5:33 pm

    Wow – I had no idea these could be homemade! They look delicious!

  14. #
    14
    naomi {@bakersroyale} — October 19, 2010 at 9:36 pm

    I must make this! It’s one of mine and my husband’s favorite candy bar! YOurs look so great. I can’t wait to try it.

  15. #
    15
    Kim Kelly — October 20, 2010 at 4:27 am

    This is my 2nd favorite candy. Now if only you could make butterfingers!! Love these, nicely done!!

  16. #
    16
    Jennifer — October 20, 2010 at 5:20 pm

    I LOVE how easy this recipe is! *saving*

  17. #
    17
    oneordinaryday — October 21, 2010 at 12:24 am

    This candy gave me awesome mom status for quite a while. : )

  18. #
    18
    nutmegnanny — October 21, 2010 at 2:34 am

    You are so talented! I wouldn’t have the patience to dip each of those little bites 🙂

  19. #
    19
    Eliana — October 21, 2010 at 8:23 pm

    I could not be trusted around these treats. They look too good to have just one, two or three….

  20. #
    20
    Kristi — November 1, 2010 at 12:12 am

    I just made these homemade 3 Musketeers. My family said they tasted like the real thing, only a little richer. Mine were definitely not as pretty, they are so ugly 🙂

  21. #
    21
    Jen — November 1, 2010 at 12:31 am

    Oh yea Kristi, mine weren’t very pretty. The only pretty ones I could find are in the picture!

  22. #
    22
    Samantha Angela @ Bikini Birthday — November 1, 2010 at 7:57 pm

    Wow! You MADE those? So impressed.

  23. #
    23
    Dee — July 13, 2013 at 2:49 pm

    Made these with my grandson and they were great! My husband now won’t eat a store bought musketeers bar.

    • beantownbaker — July 14th, 2013 @ 4:17 pm

      Isn’t that the good and bad thing about making stuff like this at home? Then you’ll never go back to store bought again!

  24. #
    24
    Kaytee — August 29, 2013 at 8:30 pm

    Could you tell me how many cups is in a 8oz tub of whipped topping??

    • beantownbaker — August 30th, 2013 @ 7:22 am

      From Kraft’s website, an 8 oz. tub of cool whip yields 3 cups.

Leave a Comment