


Almond Joy Brownies
Almond Joy’s got nuts, Mounds don’t. It’s impossible to think about those candy bars without singing the song. In fact, I can never remember which has the nuts without singing the song. Why doesn’t the Mounds have the nut since when you look at an Almond Joy, it has a mound? The mysteries of the universe…
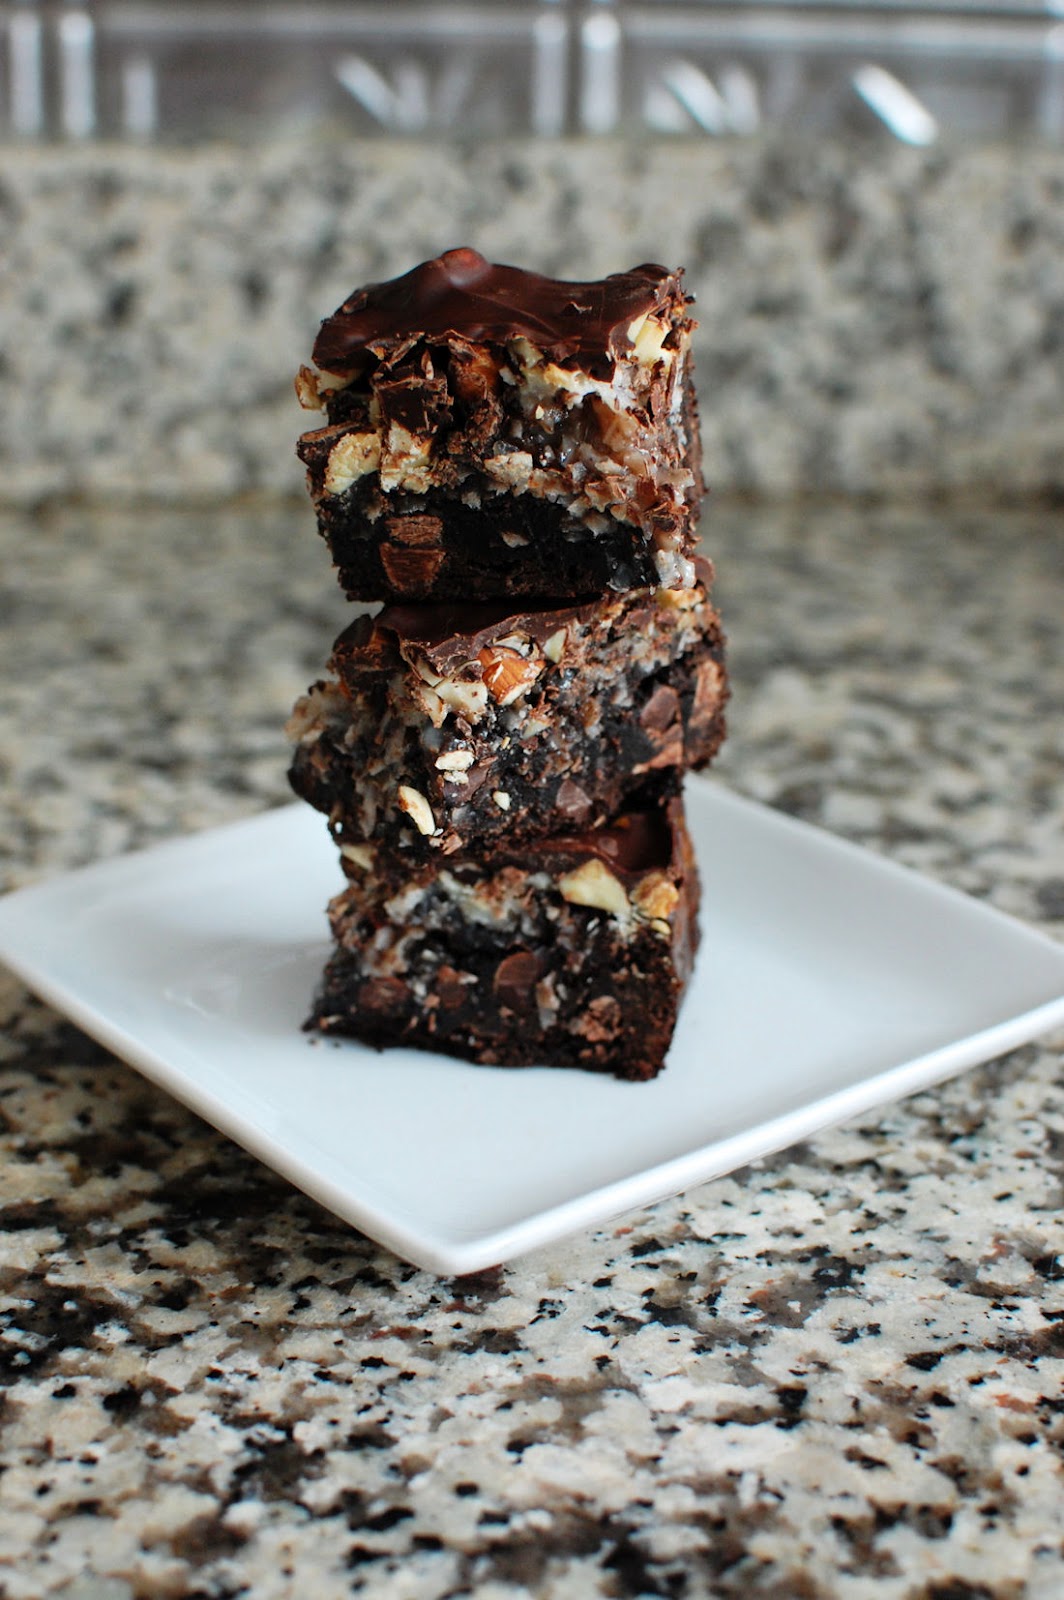
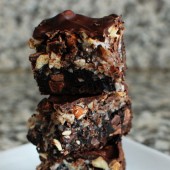
Sorry for my rambling, it happens. If you like chocolate and coconut, you’ll love these brownies. I had hoped that the coconut would be a solid layer that you’d be able to see from the side, but I guess that’s what I get for trying to swirl the brownies together.
You can see that there’s a lot going on in these brownies. There’s chocolate chips since my go-to brownie recipe includes them, there’s some coconut you can see on the edges there, there’s some chopped almonds, and of course the chocolate coating on the top.

As I said, there’s a lot going on in these brownies, but it’s a lot of awesomeness. I highly recommend letting these chill in the fridge overnight. It gives the brownies a chance to meld all those wonderful flavors together. I’d still serve them at room temperature or a bit cool, but definitely make them a day in advance.
One Year Ago: Chewy Fudgey Oatmeal Bars
Two Years Ago: Irish Car Bomb Cupcakes
Four Years Ago: Scallop Burgers


Almond Joy Brownies
Chocolate, almonds, and coconut are a perfect combination for a brownie!
Yield: 16 brownies
Ingredients:
For the Brownie
1/2 cup (1 stick) unsalted butter
1 cup + 2 Tbsp sugar
1/2 cup + 2 Tbsp cocoa
1/2 tsp salt
1/2 tsp baking powder
1/2 tsp espresso powder, optional
1/2 Tbsp vanilla
2 eggs
3/4 cups flour
1 cups chocolate chips
2 cups shredded, sweetened coconut
pinch salt
2/3 cup + 2 Tbsp sweetened condensed milk
1 cup whole almonds, chopped
For the Chocolate topping
3 oz bittersweet chocolate, chopped (or 1/2 cup bittersweet chocolate chips)
2 oz semisweet chocolate, chopped (or 1/3 cup semisweet chocolate chips)
Directions:
For the Brownies
Preheat the oven to 350°F. Lightly grease a 8"x8" pan
In a saucepan set over low heat, melt the butter, then add the sugar and stir to combine. Return the mixture to the heat briefly, just until it's hot, but not bubbling; it'll become shiny looking as you stir it. Heating this mixture a second time will dissolve more of the sugar, which will yield a shiny top crust on your brownies.
Transfer the sugar mixture to a medium-sized mixing bowl, if you've heated it in a saucepan. Stir in the cocoa, salt, baking powder, espresso powder, and vanilla.
Whisk in the eggs, stirring until smooth.
Add the flour and chips, again stirring until smooth.
Spoon the batter into a lightly greased 8"x8" pan.
In a medium sized bowl, combine the coconut, salt and condensed milk. Stir to combine. Dot the coconut mixture evenly over the brownie batter and use a knife to swirl the coconut mixture into the brownie mixture.
Sprinkle almonds over brownies.
Bake the brownies for about 30 minutes, until a cake tester inserted into the center comes out clean, or with just a few moist crumbs clinging to it. The brownies should feel set on the edges, and the center should look very moist, but not uncooked. Remove them from the oven.
For the Chocolate topping
Melt chocolate chips in the microwave by heating 20 seconds and stirring. Repeat until completely melted.
Spread melted chocolate on top of brownies (the brownies can be still warm or cool).
Refrigerate brownies overnight. This will allow all the flavors to meld together.
Recipe inspired by Baking and boys!


 I am Jen the Beantown Baker. Engineer by day and baking maven by night. Hubby serves as my #1 fan and official taste tester. We got hitched back in 2006. Barefoot. In the sand. With the waves crashing behind us. It was one of the best decisions we’ve ever made.


I love it! Where did you get the jars? Now I totally wanna do this for xmas gifts!
/Clara
I looked everywhere and just couldn’t find them. I ended up ordering them from Amazon. They weren’t very cheap so that was a bummer…
Ah bummer. What size are the jars? I wonder if Ikea would have them? Whats the amazon link?
/Clara
I ordered them from here. You want the wide mouth jars so the cupcakes fit and the 1/2 pint size is perfect.
The yellow cupcakes didn’t rise much so I added more frosting to fill the jar and the chocolate ones rose quite a bit so they had less frosting. My sister said that the chocolate one had the perfect amount of frosting or could use a smidge more, so you want a cupcake that has at least a small dome.
haha, i’ve never seen that before 🙂 love it!
OH FUN! I’ve seriously always thought about doing this and never did. I’m starring this post to remind myself at Christmas. Too cute!!
I have been dying to try this ever since I saw it last year on someone else’s blog. They actually baked the cake in the jar and then iced it like a cupcake. I am going to have to order some of those iddy jars! Too cute!
Hmmm…might have to do this for Christmas instead of those “ingredients in a jar” thing we were thinking of.
I really want to try this, but I keep reading online that you shouldn’t put frosting in the jar because it will get moldy by the time it reaches its destination. I’m sure you would have heard if it was moldy when it got to your friend right? I would just be so embarrassed if that happened. Any help?
Renee – I’ve done this twice and both times haven’t heard of any mold. I froze the cupcakes/frosting in the jars prior to shipping them. I also shipped in the winter. My one sister even didn’t go get her package from the office until a week after it arrived and it was still good. I would guess she ate her cupcakes about 10 days after I sent them. I’m not sure if shipping in warm weather will have an impact on potential mold…
Alright I’ll definitely give it a try then. It will make for a very good Easter present for my faraway friends =)
Oh that’s a good idea!! I might have to order some more jars and do the same myself…
What a clever idea! I would love to get a cupcake in the mail! 🙂 Maybe I’ll send out Valentine’s Day Cupcakesnext year!
This comment has been removed by the author.
Love these!! We have featured you on our blog. http://cutecupcakesallthetime.blogspot.com
Did you freeze them before shipping? The jars looked frosted…
beantownbaker — February 24th, 2013 @ 10:21 am
I did freeze them. They defrosted as they were shipped. I’ve done it with and without the freezing depending on the weather and whatnot.
What shipping method did you use? Overnight or Express???