


Pretzel Chocolate Chip Cookies
While most people are thinking of healthy meals and exercising, I’ve been thinking of these cookies. I made these cookies a while ago and to take on a weekend trip with friends. They were a bit hit. They combine sweet and salty into every bit. The pretzel sticks in the chocolate chip cookies also give a nice little crunch.

I always use Ghirardelli bittersweet chips in my cookies because I love the size of the chips almost as much as the flavor. They’re a bit bigger but flatter than the standard Nestle chocolate chips. If you see the Ghirardelli chips in your supermarket, I definitely recommend trying them!

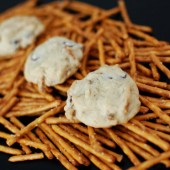


Pretzel Chocolate Chip Cookies
Yield: ~5 dozen
Ingredients:
2 1/3 cups all-purpose flour
1 teaspoon baking soda
3/4 teaspoon salt
12 tablespoons unsalted butter, slightly softened
1 cup packed dark brown sugar - I used light brown sugar
1/2 cup granulated sugar
2 large eggs
2 teaspoons vanilla
2 cups coarsely crushed pretzel sticks
2 cups bittersweet chocolate chips
Directions:
Preheat oven to 350 degrees.
In a medium bowl, whisk together flour, baking soda and salt.
In a large mixing bowl, beat together butter and sugars until creamy. Beat in eggs, one at a time, mixing until combined after each. Mix in vanilla. Gradually add dry ingredients into the butter mixture and beat just until incorporated. Add crushed pretzels and mix briefly to combine. Fold in chocolate chips.
Drop dough using a tablespoon cookie scoop onto parchment-lined baking sheets and flatten dough balls slightly. Place into the oven and bake cookies until they are lightly golden around the edges, about 9 to 13 minutes. Remove from the oven and let cookies cool for a couple minutes before transferring them to a wire rack to cool completely.
Recipe from Culinary in the Country


 I am Jen the Beantown Baker. Engineer by day and baking maven by night. Hubby serves as my #1 fan and official taste tester. We got hitched back in 2006. Barefoot. In the sand. With the waves crashing behind us. It was one of the best decisions we’ve ever made.







I am OBSESSED with French macarons. I want little bakeries all over Boston selling them. I promise to be a good customer 😉
Both of your version sound (and look) absolutely delicious!!
Looking forward to seeing what you and Megan bake next.
I am OBSESSED with French macarons. I want little bakeries all over Boston selling them. I promise to be a good customer 😉
Both of your version sound (and look) absolutely delicious!!
Looking forward to seeing what you and Megan bake next.
You should definitely get her cookbook. I’ve had mine for a few months now and it’s very drool-worthy.
That could be. It was a bit nerve-wracking to tell when they were mixed enough…
Let me know how it turns out for you.