


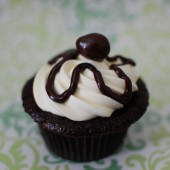
White chocolate mocha cupcakes
The theme for this month’s Cupcake Hero is coffee. Since white chocolate mocha is one of the favorites of the judge this month, I decided to make white chocolate mocha cupcakes. After making these cupcakes, I wasn’t satisfied with the flavor… To clarify, everyone loved the taste of this cupcake, they just didn’t taste white-chocolate-mocha-ey. They tasted gingerbread-ey. I plan to make another cupcake to enter into the Cupcake Hero.
 White Chocolate Mocha cupcake (adapted from White Chocolate Cupcake in Crazy about Cupcakes – original recipe shown below with my changes in Italics) – makes 24
2/3 cup milk
1 Tbsp white vinegar
2/3 cup unsalted butter, at room temperature
1 1/3 cup granulated sugar
3 large eggs, at room temperature
1 1/4 cups white chocolate chips – I used 4 oz white chocolate + 1/2 cup white chocolate chips
1/3 cup water – I omitted the water
1 tsp vanilla extract
2 cups all-purpose flour
3/4 tsp baking soda
1/4 tsp salt
2 Tbsp instant espresso, divided
Preheat oven to 325. Insert liners into a medium cupcake pan.
Combine the milk and vinegar in a cup. Set aside for at least 5 minutes. Combine the vanilla extract with 1/2 Tbsp instant espresso and set aside.
In a large bowl cream together the butter and sugar with an electric mixer on medium speed until light and fluffy, 3-5 minutes. Add the eggs one at a time, beating after each addition.
Combine 1/2 cup of white chocolate chips and the water in a small saucepan. Heat over low heat until melted, stirring continuously. Here, I used a double boiler to melt the 4 oz of white chocolate.
Add the vanilla and white chocolate mixture to the creamed mixture.
In a separate bowl combine the flour, baking soda, salt and 1.5 Tbsp of instant espresso.
Add the dry ingredients to the creamed mixture, alternating with the milk-and-vinegar mixture, beating for 1 minutes after each addition. Fold in the remaining white chocolate chips. Note: to prevent the chips from all sinking to the bottom of the cupcakes, roll them around in a bowl with 2 Tbsp flour prior to adding them to the batter.
Fill the cupcake liners three-quarters full. Bake for 20-25 minutes or until a toothpick inserted in the center of cupcakes comes out clean. Cool cupcakes in the pan.
For the White chocolate buttercream, I used the same recipe that I have used before for the White Chocolate Blueberry cupcakes I made last summer. I sprinkled the cupcakes with some ground nutmeg. I think this may have also contributed to the gingerbread-ey flavor.


 I am Jen the Beantown Baker. Engineer by day and baking maven by night. Hubby serves as my #1 fan and official taste tester. We got hitched back in 2006. Barefoot. In the sand. With the waves crashing behind us. It was one of the best decisions we’ve ever made.


This is a really interesting recipe. I haven’t seen dulce de leche combined with chocolate very often. I can see where you wanted to have the color contrast with the ganache, but I personally think it looks great as it is.
They look amazing! If you don’t want to wait 3 hours for dulce de leche you can use the microwave method found at http://www.cookingforengineers.com/recipe/255/Dulce-de-Leche.
I’m not a fan of chocolate but they are a pretty cupcake and I DO like caramel and dulce de leche!
~ingrid
That looks decadent! Choc-a-holics rejoice =D
Your cupcakes are some of the cutest I have seen!
Those look mouthwatering good!