


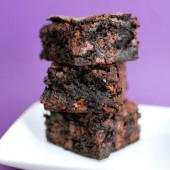
Brownie Pops
We threw a surprise birthday party for Hubby’s mom last weekend. It was a lot of fun and I think she was completely surprised – I’m pretty sure she’ll never trust us again! I had seen these in my Google Reader some time ago and knew they’d be perfect for the party.
 So first I set out to find the molds. The Michaels nearby didn’t have the pan, so I decided to just order it online (NOTE: since then, I have seen them at my Michaels). Once the pans came (I ordered two), I did a test batch and froze them. I’m glad I did the test batch. It proved that the brownies would freeze well and also reinforced my love for Ina’s brownies.
I then made the full batch of brownies about two weeks before the party and froze them. Then the day of the party, Hubby and I dipped them in the candy melts and sprinkles. We had a nice system going. He would put the sticks in then I’d dip the tops and add the sprinkles. I didn’t dip directly into the sprinkles because I had 80 pops. Instead I just sprinkled a few sprinkles on the tops (as you can see in the pictures, the few that were dipped directly into the sprinkles took on a LOT of sprinkles!).
 I used green, yellow and chocolate sprinkles to go with the color scheme I had used in the invitations that I designed. To display the pops, I got a yellow and a green flower pot from Michaels and a foam insert used for silk flowers. This worked well since the brownie pops were quite top heavy. Without the support, they probably would have fallen or tipped over.
These were a big hit at the party. You really can’t go wrong with this recipe of Ina’s. It’s actually the same base recipe as the one for the Oreo brownies that I love. These brownies are amazing and are definitely my go to brownie recipe.
 Heavenly Chocolate Brownies on a Stick – from The Cupcakery – Adapted from Ina Garten’s Outrageous Brownies – this made 80 brownie pops for me
1 pound unsalted butter
1 pound plus 12 ounces semisweet chocolate chips, divided
6 ounces unsweetened chocolate
6 extra-large eggs – I used 7 large eggs since I had large eggs on hand
3 tablespoons instant coffee powder – I used instant espresso powder because that’s what I had on hand2 tablespoons real vanilla extract
2 1/4 cups sugar
1 1/4 cups all-purpose flour, divided (1 cup for batter and 1/4 cup in the chips and nuts)
1 tablespoon baking powder
1 teaspoon kosher salt
3 cups diced walnut pieces (optional) – I omitted due to allergies in the family
Preheat oven to 350 F degrees
For this project I am using the brownie pop mold pan. For regular brownies which can be cut out with fun cookie cutter shapes, grease and flour a 13 x 18 x 1 1/2-inch pan.
Melt together the butter, 1 pound chocolate chips, and unsweetened chocolate on top of a double boiler. Cool slightly.
Stir together the eggs, instant coffee, vanilla and sugar.
Stir in the warm chocolate mixture and cool to room temperature.
Stir together 1 cup of the flour, baking powder and salt.
Add to cooled chocolate mixture. Toss the walnuts (optional) and 12 ounces of chocolate chips with 1/4 cup flour to coat. Then add to the chocolate batter.
Spray mold with non-stick cooking spray. Pour the batter into prepared mold. I used a cookie scoop to portion the batter. Be careful not to overfill the molds or else it’ll overflow some and your pops will look like hats.
Place the mold(s) onto a cookie sheet and put into preheated oven. Bake for about 25 – 30 minutes, or until tester just comes out clean. Do not over-bake! Mine took the full 30 minutes. To cool them, I flipped them directly only a cooling rack by holding the rack on top of the mold and then flipping them out. Then I threw the mold into the freezer for a few minutes to cool it down before refilling with more batter.
Cool thoroughly!
Process we used to pretty up the brownie pops:craft sticks
candy melts – we used white
sprinkles
foam square – optional
 Melt your candy melts per directions on the package.
After the brownies are thawed, use a craft stick (the thicker ones used for cookie bouquets) to poke a hole in the bottom of the brownie pop. Then dip the stick in the candy melts and stick back in the hole. The candy melts will serve as some glue.
Place sticks in foam board to allow to set.
Once “glue” has set, hold pop by stick and dip the top into the candy melts. Apply sprinkles by dipping in sprinkles for full coverage, or just sprinkle with colored sprinkles. I did a few dipped, but most were just sprinkled with sprinkles.
Place back in foam board to allow the candy to set.
Enjoy!


 I am Jen the Beantown Baker. Engineer by day and baking maven by night. Hubby serves as my #1 fan and official taste tester. We got hitched back in 2006. Barefoot. In the sand. With the waves crashing behind us. It was one of the best decisions we’ve ever made.


This is my go-to brownie recipe also. I made them for Christmas this year and people said they were the best brownies they’d ever had. They really are as good as advertised!
Yum ! Love the pictures. This recipe reminds me of our trip to vermont last fall.
I’m always more likely to opt for a tangy, fruity dessert over a chocolatey one, but I love brownies as a midday snack 🙂 These look sooo good!
What kind of cocoa powder?
beantownbaker — March 3rd, 2013 @ 11:13 am
Any kind will work. I like to use Ghirardelli or Scharffen Berger
My absolute favourite brownie recipe – easy to make, absolutely delicious and always go down a storm.
I like to freeze mine in smaller batches for weekend treats 🙂
beantownbaker — December 26th, 2013 @ 10:58 am
I do the same thing! I always double the recipe and throw the extras in the freezer. Nothing beats a tiny bite of frozen brownie goodness!