


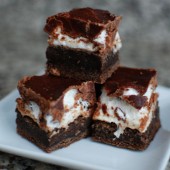
Samoas Bars
Hubby loves girl scout cookies. Specifically Samoas. I grew up in the Midwest, and we always called them Caramel Delights. Whatever you call them, everyone loves them. I saw this recipe come up and I knew I had to make these.
 These bars do take a little bit of time because each step requires some wait time before you can move on to the next step. In the end, they’re definitely worth the effort. Hubby did comment that the cookie part tasted a bit off. I think there’s just a higher ratio of the cookie part than in the girl scout version.
 Homemade Samoas Bars – from Baking Bites – makes 30 barsCookie Base:
1/2 cup sugar
3/4 cup butter, softened
1 large egg
1/2 tsp vanilla extract
2 cups all purpose flour
1/4 tsp salt
First, make the crust.
Preheat oven to 350F. Lightly grease a 9×13-inch baking pan, or line with parchment paper.
 In a large bowl, cream together sugar and butter, until fluffy. Beat in egg and vanilla extract. Working at a low speed, gradually beat in flour and salt until mixture is crumbly, like wet sand. The dough does not need to come together. Pour crumbly dough into prepared pan and press into an even layer.
Bake for 20-25 minutes, until base is set and edges are lightly browned. Cool completely on a wire rack before topping.
Topping:
3 cups shredded coconut (sweetened or unsweetened) – I used sweetened
12-oz good-quality chewy caramels – I used the Kraft caramel bits
1/4 tsp salt
3 tbsp milk
10 oz. dark or semisweet chocolate (chocolate chips are ok)
Preheat oven to 300. Spread coconut evenly on a parchment-lined baking sheet (preferably one with sides) and toast 20 minutes, stirring every 5 minutes, until coconut is golden. Cool on baking sheet, stirring occasionally. Set aside.
Unwrap the caramels and place in a large microwave-safe bowl with milk and salt. Cook on high for 3-4 minutes, stopping to stir a few times to help the caramel melt. When smooth, fold in toasted coconut with a spatula.
 Put dollops of the topping all over the shortbread base. Using the spatula, spread topping into an even layer. Let topping set until cooled.
When cooled, cut into 30 bars with a large knife or a pizza cutter.
 Once bars are cut, melt chocolate in a small bowl. Heat on high in the microwave in 45 second intervals, stirring thoroughly to prevent scorching. Dip the base of each bar into the chocolate and place on a clean piece of parchment or wax paper – I used a spoon to spread some melted chocolate on the bottom of each bar. I then laid them chocolate side up to set the chocolate.
Transfer all remaining chocolate into a piping bag or a ziploc bag with the corner snipped off and drizzle bars with chocolate to finish.
 Let chocolate set completely before storing in an airtight container.
Makes 30 bar cookies.


 I am Jen the Beantown Baker. Engineer by day and baking maven by night. Hubby serves as my #1 fan and official taste tester. We got hitched back in 2006. Barefoot. In the sand. With the waves crashing behind us. It was one of the best decisions we’ve ever made.


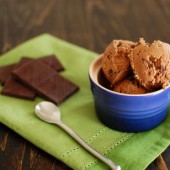
This looks amazing, Jen. I think both my husband and I are slowly becoming more lactose intolerant as we get older. Goat milk ice cream may be something we’ll try soon. Can’t wait to see what other non-dairy ice creams you come up with!
beantownbaker — June 19th, 2013 @ 10:23 am
Thanks! Like I said, coconut milk has been my go-to so far, but it’s definitely fun to try new milk varieties.
Looks incredible, I need to find a local goat milk supplier…
beantownbaker — June 19th, 2013 @ 10:24 am
Yea, I definitely want to find someone local to get my goat milk from. For now, I’m just happy that I can find it at all. Even back in Boston, it wasn’t on the shelf at my grocery store.
This looks amazing and I love that you used goat milk..so interesting!
i had to give up gluten a few months ago and just realized a few weeks ago that i also must give up dairy. i am not sure if it is lactose or casein that i am intolerant of, but i love that you are doing stuff that i may be able to eat someday! (also, we bathe Olive is goat’s milk. it’s great for her eczema!).
beantownbaker — June 20th, 2013 @ 6:58 am
Going dairy free isn’t too bad honestly.
Oh wow, bathing in goats milk sounds so luxurious!
Oh wow, this looks so perfect! I’d love to try this soon 🙂
Sounds delicious, I’ve not thought about using goats milk in ice cream before but would love to try it!
beantownbaker — June 24th, 2013 @ 8:24 pm
You should definitely try it!
Thank you so much for posting this!! I gave up cow dairy in the winter (makes me break out) and have been glaring at my ice cream maker, because sorbets are just not the same and coconut ice cream is good, but so coconutty! I’ve been wondering if I could make ice cream with goat’s milk and now I know I can! The canister just went into the freezer 🙂
beantownbaker — June 24th, 2013 @ 8:23 pm
Nice – glad I could help. I don’t find coconut milk very coconuty… I assume you drink goat’s milk so you’re familiar with the flavor? It definitely has a distinct taste.
Goat milk?? I bet it goes fantastic with chocolate. I love this combination, I can’t wait to try it, yum!!
In the ingredients, you say condensed goat milk, but the directions say heavy cream. Which did you mean? Really excited to try out this recipe!
beantownbaker — July 22nd, 2013 @ 1:14 pm
Sorry about that. I used condensed goat milk, not heavy cream. I’m updating the recipe now.
Hello,
I want to place an order from you to our store in The Netherlands.I want to know if you can ship here and accept credit card as a form of payment.
Reply back asap
Thanks
beantownbaker — September 4th, 2013 @ 9:27 am
I don’t sell anything.
My wife and I raise a couple of dairy breed goats for home milk use. I don’t find that the milk tastes goaty, it’s actually richer and better tasting than cows milk in my opinion. Although before we discovered that we should pasteurize the milk asap after filtering, we did notice a musky kind of taste…… but with pasteurization started within a minute or two after milking, our milk is just as good or better than the flavor of cows milk. I just ordered an icecream maker. We will definitely use this recipe. Thanks for posting it.
beantownbaker — September 25th, 2013 @ 4:15 pm
Fresh goat milk is not something I have tried. I would love to get my hands on some though!
I’m looking forward to trying this! We got hooked on Laloo’s goat milk ice cream several years ago, but it’s been increasingly difficult to find, and very expensive ($7.79 a pint as of 2 days ago). It would be great if I could find a homemade alternative.
beantownbaker — January 2nd, 2014 @ 1:36 pm
I agree – Laloo’s is good, but quite expensive. Let me know what you think of this recipe if you try it out.
GOOD NEWS!! Laloos is filling the pipeline and more flavors are coming soon to you your local Whole Foods store.
I have dairy goats so will toss in my 2 cents worth 😉 Not all goat milk is the same!!! If you like the goaty taste, go ahead and buy your milk at the store. Personally I find the goaty taste vile and disgusting! So for those who want to try goat milk but don’t like that nasty goaty taste, you want raw milk, and the breeds vary in taste a lot. Nigerian Dwarf goats have the highest butterfat and do not have the goaty taste. Their milk is really good! Nubians are second best. It would be worth your while to find a local source of nice raw milk from either of those breeds. Healthier too, as raw milk has all the nutrients nature intended.
With rare exceptions – goat’s milk should not taste goaty. I can’t comment about grocery store milk, but would urge you and your readers to look for direct-from-the-farm sources. There are a few goats with funny tasting milk – and those work great for making blue cheese! If a goat is healthy, has a good diet with the right balance of vitamins and minerals (very important!), and the milk is handled in a clean manner with quick cooling, it should have a rather sweet taste. I have Nubians and like Cindy above, appreciate the high butterfat. If you’re looking for a milk source – try realmilk.com. There’s also tips there for buying safe milk.