


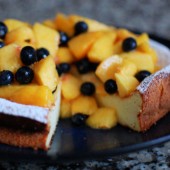
Goat Cheese Cake with Peach and Blueberry Topping
I have to admit I a very visual eater. I think that’s why I love food blogs so much. I see a great picture of food and I want to try it. You could show me the same recipe without a picture and it wouldn’t peak my interest nearly as much.

This actually leads to difficulties for me when looking for cookbooks. In Jen’s world, all cookbooks would have a full color photo for each recipe.
So I actually surprised myself when I decided to make this recipe. Hubby and I had done some peach picking and I was searching for good peach recipes. None of the cobblers, crumbles, or pies were popping out at me even with their delcious looking photographs. But somehow, this little recipe caught my eye.

I think I was intrigued by the combination of goat cheese, peaches, and blueberries. Other than just eating with my eyes first, I also like to know what to expect. So many recipes out there produce different textures or colors, so it’s just nice to know ahead of time what you’re going to get.

I felt really silly when I took this cake out of the oven to see that it was like a cheese cake. Now that might sound like a crazy comment since the name of the cake is goat cheese cake, but in all honesty, by calling it goat cheese cake instead of goat cheesecake, I was not expecting a cheesecake.

What I was expecting was more like a yogurt cake. As most of you know, yogurt is a common ingredient used in cakes to keep things really moist. I just figured that the goat cheese was used in place of the yogurt to produce a denser version of a yogurt cake. Even the batter supported this theory. It looked and tasted like I figured it would.

But like I said, I was shocked when I took it out of the oven. It had risen up quite a bit and browned similar to a cheesecake. It even deflated as it cooled. I was still perplexed until I actually took my first bite. It was totally a DUH! moment. The cake tasted like a lighter version of a cheesecake with a bit of tanginess from the goat cheese. And it was heavenly.

The fresh fruit piled on top provided the perfect amount of sweetness to counter that tanginess. This recipe might just become my go-to cheesecake recipe, it was that good. And I can eat it since it doesn’t have pounds and pounds of cream cheese in it!
I think from now on, I’ll stick with recipes that have pictures so I know what I’m getting into! What do you guys think? Do you prefer recipes with pictures or are they just an added bonus?
One Year Ago: Indian Spinach and Chickpeas
Two Years Ago: Eclairs


Goat Cheese Cake with Peach and Blueberry Topping
Yield: 12
Ingredients:
3/4 pound fresh goat cheese, at room temperature
3/4 cup plus 2 Tbsp sugar
1 1/2 tsp fresh lemon juice
1 tsp lemon zest
1 tsp vanilla
6 eggs, separated
3 Tbsp all-purpose flour
3 large peaches, peeled, pitted, and cut into 1/4 inch thick slices
1/2 cup blueberries
Powdered sugar
Preheat the oven to 350 degrees F. Butter a 9-inch round cake pan and dust it with 1 tablespoon of the sugar.
Directions:
In a medium bowl, combine the goat cheese with the 3/4 cup sugar, lemon juice, lemon zest, and vanilla. Beat at medium speed until smooth. Beat in the egg yolks, one at a time, incorporating each one completely before adding the next. Turn the mixer to low and add the flour.
In another bowl, using clean beater, beat the egg whites until firm. Beat one third of the egg whites into the cheese mixture. Gently fold in the rest of the egg whites. Spoon the batter into the prepared pan and bake until a toothpick inserted in the center comes out clean and the cake is a deep golden brown, 35 to 40 minutes. Do not underbake. Cool for 15 minutes on a cooling rack. Remove the cake from the pan and cool completely.
In a bowl, mix the peaches and blueberries together with the remaining 1 tablespoon sugar. (You may need less or more sugar, depending on the sweetness of the fruit.) Set aside.
When ready to serve, invert the cake onto a serving plate. Dust with confectioners' sugar, and spoon the fruit on top of the cake, leaving a 1-inch border all the way around. Cut and serve, garnishing each piece with a little whipped cream, if desired.
Recipe from Food Network


 I am Jen the Beantown Baker. Engineer by day and baking maven by night. Hubby serves as my #1 fan and official taste tester. We got hitched back in 2006. Barefoot. In the sand. With the waves crashing behind us. It was one of the best decisions we’ve ever made.


The filling is so neat tucked in the cupcakes, Jen, that is perfect! Nice swirl you have created there, too. I am pretty sure your beloveds are spoiled!
Thank you for your participation on Cupcakes Spectacular 2008.
Cheers,
ab
Wow, those look fantastic! I love the cone method, that is something I will be trying very soon!
Hahaha! My hunkster is my primo taste tester, too! And that filling in those cupcakes is amazing. I love how perfect the frosting is. Lovely.
what a cute cupcake! i love raspberries…
Your cupcake has been chosen for ATC’s Weekly Cupcake Collection! Click the link to see more. Looking forward to your next cupcake creation!