


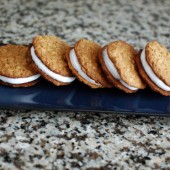
Homemade Oatmeal Cream Pies
I had to save the best for last this week. Oatmeal Cream Pies were my all time favorite. There’s just something about that soft chewy oatmeal cookies with the cream filling smooshed between.

I have a confession to make about the store bought version of this cookie. When I was in High School, I was the yearbook editor senior year with a good friend of mine K. He and I had a class period each day to do yearbook work as an independent study class. We had the yearbook room to ourselves for one hour a day. It was a lot of fun. We kept Oatmeal Cream Pies in the yearbook drawer and would house these things on a regular basis. We’d go through a disgusting amount of these cookies in one hour. Thank goodness for my high-school metabolism (which has since vanished), as well as my stomach of steel. Oh man, parts of high school were a good time.

Back to reality. In the past 10+ years since then, my stomach has become more sensative to dairy and other foods, and I have to work to not gain weight. I’ve learned a lot about how to eat healthy and gained quite the love of cooking and baking. I’ve also learned that most store bought foods can be made a hundred times better at home.

These cookies are no exception. The brown sugar in the cookies keeps them perfectly soft and the filling is so much better than what’s in the store bought version. It’s like a homemade marshmallow fluff, and it’s amazing. I packaged them in celophane bags so they were easy to throw into lunches for me and Hubby this week.
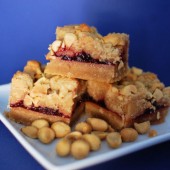
One Year Ago: Best Dang Thing Ever Bars


Homemade Oatmeal Cream Pies
Yield: 24
Ingredients:
For the Cookies
3/4 cup unsalted butter, softened
2 cups packed brown sugar
2 eggs
1/2 tsp salt
2 cups flour
1 tsp baking powder
1 tsp ground cinnamon
2 cups quick-cooking rolled oats
2 tsp baking soda
3 Tbsp boiling water
For the Filling
1 Tbsp plus 1 tsp unflavored gelatin (about 1 1/2 packets)
1/3 cup plus 1/4 cup water (divided)
3/4 cup sugar
1/2 cup light corn syrup
2 tsp vanilla
1 cup powdered sugar
8 ounces vegetable shortening
Directions:
Make the cookies
Preheat the oven to 425 degrees F. Lightly grease a baking sheet and set aside (or use parchment).
Cream the butter, sugar, and eggs in a large bowl.
In a separate bowl, sift together the salt, flour, and baking powder. Add to the creamed mixture. Add the cinnamon and oats. Mix well.
In a small dish, add the baking soda to the boiling water, and then stir the mixture into the rest of the batter. Mix well.
Drop by the tablespoon onto the baking sheets about 2 inches apart and bake until the cookies are firm and just starting to turn golden around the edges, 10 to 15 minutes. Cool the cookies on a wire rack or a plate.
Make the filling
In a small measuring cup, sprinkle the gelatin over 1/3 cup cold water. Let stand, stirring once or twice until the gelatin softens, about 5 minutes.
In a heavy 2-quart saucepan over medium-high heat, stir together the granulated sugar, corn syrup, and 1/4 cup hot water until well blended. Continuing to stir, raise the heat to high and bring to a full boil. Continue boiling for 30 seconds. Immediately remove from the heat. Stir in the gelatin mixture until it dissolves completely.
Transfer the mixture to a large bowl. Add the vanilla.
With a mixer on medium speed, beat for 20 seconds. Gradually raise the speed to high and beat until the mixture is stiffened, white, very fluffy, and cooled to barely warm, about 5 minutes.
Reduce the mixer speed to low and gradually add the powdered sugar.
Add the shortening and beat until completely smooth.
The filling will set up as it sits, so wait until it is thick enough to spread or pipe before filling the cookies.
Recipe from How to Eat a Cupcake


 I am Jen the Beantown Baker. Engineer by day and baking maven by night. Hubby serves as my #1 fan and official taste tester. We got hitched back in 2006. Barefoot. In the sand. With the waves crashing behind us. It was one of the best decisions we’ve ever made.


As a teacher, I still get nervous for the first day of school! Same butterflies in my tummy I had for the first day of high school 🙂
The look SO yummy, hope to try making them soon.
The flavor combination of PB&J always brings me back to my childhood. I loved the first day of school – new outfit, new backpack and school supplies…
Yum these look great Jen!! I totally agree on adding more jelly or jam to these…the ooey gooey of PB sticks to the roof of my mouth. Make sure to have milk if these bars are made! LOL
Tomorrow marks the first day of my eight year of teaching so I love your back to school post. I am bookmarking this recipe, love PB & J!
I have been obsessed with peanut butter lately and these look simply amazing….even if I’m not headed back to school! Yum!
These bars looks absolutely perfect.
My favorite part of going back to school was (and I know I’m a nerd for saying this) was using new school supplies. My mom always got us the best pens, pencils, folders, binders, erasers…you name it. And whipping them out the first week of class was the best feeling ever.
This looks perfect for the back to school season! I’m a nanny so I know the little I watch would love to make these for herself and friends. I guess I know what we are doing tonight 🙂
This is very similar to my favorite workout bar–Clif Mojo Peanut Butter & Jelly. Maybe I can start saving money and make my own bars. Thanks!
I’ve made something similar before, but these look SO good my stomach is grumbling 🙂 Definitely bookmarking for soon! I miss the new outfits and seeing who’s in all your classes 🙂
Sues