


Caramelized Apple Grilled Cheese
Hubby and I went apple picking a couple weeks ago, so I’ve been trying to use up our apples. We’ve been eating a lot of them just raw since we both take two apples in our lunch every day. I also made a big batch of cranberry applesauce, which Hubby LOVES. I was working from home the other day and typed apple into my Google Reader to see what would pop up.

Amidst all the cobblers, pies, and other desserts, there was this sandwich. My stomach was grumbling for lunch so I threw it together. Wow, this sandwich is awesome. And it’s really easy to make.
Start by caramelizing the apples in some cinnamon, butter, and brown sugar.

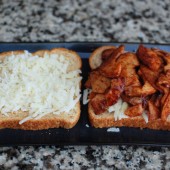
While the apples are cooking, get out two pieces of bread and add some cheese. I shredded some goat milk Gouda since that’s what I had on hand. Cheddar would be awesome too.

When the apples are done, pour them onto one of the pieces of bread. Then top the apples with the other piece of bread.

Add more butter to your pan and plot down the sandwich. Then walk away for about 3 minutes. You’re going to want to poke at it, but don’t!

Flip your sandwich and let the other side cook for about 2 minutes. I like my grilled cheese like I like my bacon and toasted marshmallows – burnt and crispy. If you don’t want yours this “well done” just flip is sooner.

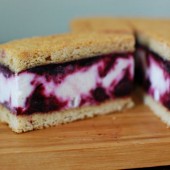
Take the sandwich off the pan and let it cool a minute. Then cut in half on the diagonal. Grilled cheese just tastes better when it’s cut this way. Trust me. Try not to burn your tongue like I did. I just couldn’t wait to dig in.

I did want to add that this sandwich is very much like apple pie in a sandwich. So if you’re not up for something quite so sweet, try this – use 1/2 of an apple instead of a whole apple per sandwich and add a few slices of bacon. The more savory version is Hubby’s favorite.


Caramelized Apple Grilled Cheese
Yield: 1
Ingredients:
1 Tbsp butter
1 Tbsp brown sugar
1 dash of cinnamon
1 apple (peeled, cored and sliced)
2 thick slices of good cheese (cheddar or gouda work well)
2 slices of good bread
1 Tbsp butter
Directions:
Melt the butter in a non-stick pan.
Add the sugar and cinnamon and cook until bubbly.
Add the apples and saute until tender, about 5 minutes.
Assemble sandwich and grill until golden brown on both sides, about 2-4 minutes per side.
Recipe from Closet Cooking

Don’t forget about my Power of Pink Challenge – make something PINK by the end of the month to raise Breast Cancer Awareness!

 I am Jen the Beantown Baker. Engineer by day and baking maven by night. Hubby serves as my #1 fan and official taste tester. We got hitched back in 2006. Barefoot. In the sand. With the waves crashing behind us. It was one of the best decisions we’ve ever made.


Ooooooooo…looks heavenly! I can’t wait to try it! Nice job!