


My Favorite Brownies
I freaking love brownies. They might be my favorite dessert. I mean, I’d never say no to any dessert, especially if it’s chocolate, but there’s just something special about brownies. They’re great still warm and gooey, great at room temperature, and even great chilled. Brownies freeze well and ship well too. But you guys already know how awesome brownies are so let’s just cut to the chase.

I’ve made a lot of brownies in my days. And it’s always this recipe. Sure, I’ve tried others, but I always come back to this one. I love how easy it is and how you don’t have to get the mixer out for it. This recipe has been made so many times in our kitchen, I can make it from memory. And, it gives great results every time.

As I mentioned, I’ve made this recipe plenty of times before. You may recognize it in these Peanut Butter brownies, Mint brownies, Cookie Dough brownies, Mocha brownies, and Mini Chocolate Chip Cookie Dough Brownie Cupcakes. So, yea it’s been posted on here before. But never alone in all it’s glory.
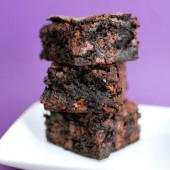
I always use a mix of dark chocolate cocoa and regular cocoa to give the really dark color of the brownies. I love the chocolate chips in these brownies too. They kick up the chocolatey-ness and add another texture. Basically, you can’t go wrong with this recipe. You can half this recipe for an 8×8 pan if you’d like.
One Year Ago: Strawberry Shortcake Cookies
Two Years Ago: Blondies


My Favorite Brownies
I absolutely LOVE brownies. This recipe yields brownies that are fudgey without being too fudgey.
Yield: 24 brownies
Ingredients:
1 cup (2 sticks) unsalted butter
2 1/4 cups sugar
1 1/4 cups cocoa
1 tsp salt
1 tsp baking powder
1 tsp espresso powder, optional
1 Tbsp vanilla
4 eggs
1 1/2 cups flour
2 cups chocolate chips
Directions:
Preheat the oven to 350°F. Lightly grease a 9" x 13" pan.
In a saucepan set over low heat, melt the butter, then add the sugar and stir to combine. Return the mixture to the heat briefly, just until it's hot, but not bubbling; it'll become shiny looking as you stir it. Heating this mixture a second time will dissolve more of the sugar, which will yield a shiny top crust on your brownies.
Transfer the sugar mixture to a medium-sized mixing bowl, if you've heated it in a saucepan. Stir in the cocoa, salt, baking powder, espresso powder, and vanilla.
Whisk in the eggs, stirring until smooth.
Add the flour and chips, again stirring until smooth.
Spoon the batter into a lightly greased 9" x 13" pan.
Bake the brownies for about 30 minutes, until a cake tester inserted into the center comes out clean, or with just a few moist crumbs clinging to it. The brownies should feel set on the edges, and the center should look very moist, but not uncooked. Remove them from the oven and cool completely prior to cutting.
Recipe from King Arthur Flour


 I am Jen the Beantown Baker. Engineer by day and baking maven by night. Hubby serves as my #1 fan and official taste tester. We got hitched back in 2006. Barefoot. In the sand. With the waves crashing behind us. It was one of the best decisions we’ve ever made.


I’ve had my eye on these for a while now! They look fabulous!
These sound great, I love coconut!
Those look delish! I’ll bet my husband would love those.
Loving the cupcake creation and the filling looks SO good!!
I have cupcake envy – this looks fantastic!
These look amazing!!
HOLY COW!!! I just stumbled upon your blog and am I ever glad I did!
From one Massachusetts “sista” to another….these look AMAZING, Jen.
I can’t WAIT to try them. I’m enjoying all of your other delicious dishes too!!! 🙂
Hello Dear, are you truly visiting this website regularly,
if so aftr that you will absolutely get good knowledge.