


Butterbeer Recipe
Leading up to the midnight showing of the final Harry Potter movie, I really wanted to have a Harry Potter party. It wasn’t in the cards, so instead I made some Harry Potter themed treats for Hubby and I to enjoy while watching Deathly Hallows Part I the other night.

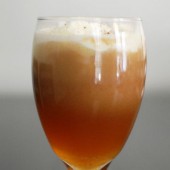
There are quite a few recipes for butterbeer out there. But I wanted to make something that matches what butterbeer was in my mind while reading the books. To me, butterbeer is warm, buttery, and spiked with a bit of some spicy alcohol. The warm butterbeer is topped with a frothy whipped foam on top that leaves a mustache when you take a sip.
I set out to develop this recipe and Hubby and I agreed that this butterbeer was delicious and very fitting for Harry and his friends.
One Year Ago: French Silk Pie


Butterbeer
Yield: Serves 2
Ingredients:
For the Butterbeer
1/3 cup packed dark brown sugar
1/4 cup (1/2 stick) unsalted butter, room temperature
2 Tbsp honey
1/4 teaspoon ground cinnamon
1/8 teaspoon ground nutmeg
1/16 teaspoon ground cloves
Pinch salt
3 Tbsp toffee bits (you can use butterscotch chips here if you have those on hand)
1/3 cup spiced rum
1 cups boiling water
For the Foam
2/3 cup heavy cream
2 tablespoons sugar, or splenda for sugar free version
1 teaspoons vanilla extract
1/2 teaspoon butter
Directions:
Prepare the butterbeer:
Using an electric mixer, beat the brown sugar, butter, honey, cinnamon, nutmeg, cloves, and salt in a medium bowl until blended and smooth. Stir in the toffee bits Transfer the mixture to a 4-cup (or larger) measuring cup. Add the rum and then the boiling water. Stir until the butter mixture dissolves. Pour through a sieve to remove any toffee bits that did not dissolve. Divide the buttered rum among 2 mugs.
Prepare the foam:
In a large bowl, or the bowl of a standing mixer, whip the heavy cream on medium high speed for 3-4 minutes until it starts to thicken. Add the sugar and continue whipping until very soft peaks begin to form, another 3-4 minutes. Stir in the vanilla and butter, then whip for another 30 seconds or so, until soft peaks form.
Spoon a generous portion of foam on top of each glass of butterbeer, mixing gently. Serve immediately.
Recipe adapted from Food Network and Bakingdom


 I am Jen the Beantown Baker. Engineer by day and baking maven by night. Hubby serves as my #1 fan and official taste tester. We got hitched back in 2006. Barefoot. In the sand. With the waves crashing behind us. It was one of the best decisions we’ve ever made.


