


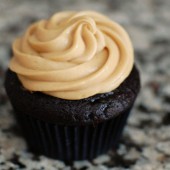
Chocolate Biscoff Cupcakes
Have you noticed all the recipes recently popping up with Biscoff Spread? I had the chance to sample some that came in my TechMUNCH goodie bag. I gobbled up my samples by dipping apples in them, but I knew I needed to jump on this baking with Biscoff spread bandwagon.

When I recently saw a jar at my local grocery store, I grabbed one. Hubby was intrigued and after tasting a bit, I was worried he’d start eating it by the spoonful. I needed to use it ASAP!

If you haven’t tried the spread, it literally tastes just like the Biscoff cookies that we’ve all enjoyed on Delta flights. In fact, the first ingredient is Biscoff cookies. If you’ve never had a Biscoff cookie, the spread has a caramely flavor.

Since the spread is relatively new to the US, there aren’t a whole lot of recipes out there. I decided to pair it with a chocolate cupcake.

I frosted the cupcake with a Biscoff cream cheese frosting and filled it with straight Biscoff spread. Knowing that the spread is pretty sweet, I added a heavy pinch of salt to the filling as well. The salt in these cupcakes really take them to the next level. They’re seriously delicious.

One Year Ago: Cuban Black Beans in the Crockpot and Baja Fish Tacos
Two Years Ago: Banana Split Cupcakes and Lemon Blueberry Ice Cream Bars
Three Years Ago: Blueberry Buckle


Chocolate Biscoff Cupcakes
Ingredients:
For the Frosting
1 (8 oz) cream cheese, softened
1/2 cup Biscoff Spread
1/2 cup powdered sugar
1/2 tsp vanilla extract
For the Cupcakes
12 of your favorite chocolate cupcakes, completely cooled - I used this recipe
1 batch Biscoff frosting
Biscoff spread
Sea salt
Directions:
For the Frosting
Beat the cream cheese in a mixer for 2 minutes until smooth.
Add the Biscoff spread and beat until completely combined.
Add the powdered sugar and vanilla. Turn the mixer on the lowest setting until powdered sugar is mostly mixed in. Turn mixer up to med and beat for 1-2 minutes. Store in refrigerator until ready to use.
For the Cupcakes
Once cupcakes are completely cooled, use the cone method to remove a portion of the cupcake.
Scoop ~1 tsp of Biscoff spread into each cupcake. Sprinkle a scant 1/8 tsp of sea salt (or a heavy pinch) on top of the spread. Replace the top of the cupcake.
Pipe Biscoff frosting on top of cupcakes. Store in fridge.
Frosting adapted from Biscoff


 I am Jen the Beantown Baker. Engineer by day and baking maven by night. Hubby serves as my #1 fan and official taste tester. We got hitched back in 2006. Barefoot. In the sand. With the waves crashing behind us. It was one of the best decisions we’ve ever made.


mmm they look so super moist!
Yum! Those look really good! I’ve never tried white chocolate with pumpkin.
Wow white chocolate and pumpkin! What a delicious combination…yum!
I made those last year, and MAN OH MAN aren’t they good!
I have in the oven, a chocolate-pumpkin streusel brownie. Now, I want to make this too.
You have great recipes. Thanks.
These look delicious! And I totally do not blame you for having a couple before taking them to give away!
I love that you ate 2 while you were cutting them! 🙂 That sounds familiar!
They look wonderful!
These are the same bars I made, but I added cinnamon chips per recommendation from Maria at Two Peas in their Pod. They were great! Glad to see they turned out well for you too!
I totally agree I’m not crazy about chocolate and pumpking together. Another great flavor with pumpkin (in my opinion) is gingerbread.
I’m definitely adding this to my list of pumpkin recipes that will be baked from here until the kiddos say no more! 🙂
~ingrid
I love making bars. These look amazing. I will definety try these soon!
I made these last night to take tailgating at a college football game tonight and they are SO yummy! I used semisweet chips instead of white chocolate, but I bet they’d be good either way! I’m Really glad you warned that the mixture might look like it curdled after adding in the pumpkin, because I think it would have freaked me out and I would have thought I did something wrong!