


My Go-To Chocolate Cupcake Recipe
I’ve finally found it. A go-to chocolate cupcake recipe. This recipe yields consistent results every time I make it. I get exactly 12 domed chocolate cupcakes. And the batter is so easy to throw together. You don’t even have to get the mixer dirty.

I owe a huge thanks to Megan from Delicious Dishings. I had asked her about her favorite chocolate cupcake recipe and she recommended the one found in Joanne Chang’s Flour cookbook. Now, Megan worked at Flour, so I thought she might be a little biased. But then I made the cupcakes for my birthday. And ever since then, every time I need a chocolate cupcake, I just go to this recipe. And believe me, I’ve made quite a few chocolate cupcake recipes.

These cupcakes don’t have any random ingredients that you might not have on hand like sour cream or coffee, which means I can whip them up whenever a craving hits. Do note that the batter has to sit for an hour (or up to three days in the fridge) to allow all the dry ingredients to soak up the liquid ingredients. So be sure to give yourself plenty of time to make these cupcakes. Believe me, they’re well worth the wait.
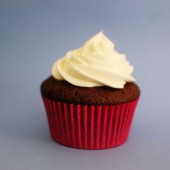


Chocolate Cupcakes
Yield: 12 cupcakes
Ingredients:
2 oz unsweetened chocolate, chopped
1/4 cup Dutch-process cocoa powder
1 cup sugar
1/2 cup (1 stick) butter, cut up
1/3 cup water
1/2 cup milk
1 egg
1 egg yolk
1/2 tsp vanilla
1 cup flour
1 tsp baking powder
1/2 tsp baking soda
1/2 tsp salt
Directions:
In a heatproof bowl, combine chocolate and cocoa powder.
In a saucepan over medium heat, heat the granulated sugar, butter, and water, stirring occasionally, until the butter melts and the sugar dissolves. Pour the butter mixture over the chocolate and whisk until the chocolate melts and the mixture is smooth.
Whisk the milk, egg, extra yolk, and vanilla into the chocolate mixture until combined.
In a bowl, stir the flour, baking powder, baking soda, and salt until blended. Add the flour mixture to the chocolate mixture and whisk until smooth.
Let the batter sit at room temperature for 1 hour or cover and refrigerate for up to 3 days.
Line a standard 12-cup muffin tin with paper liners. Preheat the oven to 350 degrees.
Divide the batter among the muffin cups. Bake for 30 minutes or until the tops spring back when pressed lightly with a fingertip. Set on a wire rack and leave to cool completely.
Recipe from Joanne Chang, as seen in the Flour cookbook


 I am Jen the Beantown Baker. Engineer by day and baking maven by night. Hubby serves as my #1 fan and official taste tester. We got hitched back in 2006. Barefoot. In the sand. With the waves crashing behind us. It was one of the best decisions we’ve ever made.


Yum! And festive… I’m glad there’s another Boston blogger out there that loves making cupcakes as much as I do!!!! 🙂
These cupcakes look amazing!! I love white chocolate, and the tart cranberry flavor sounds like a fantastic accompaniment :).
While I adore pumpkin, I think it is great that you did something different from the norm. The cranberry sauce filling looks really good!
These look great! I have some cranberries I have been debating what to make.
These are so beautiful! I love the idea of white chocolate cupcakes…. and cranberry sounds just perfect. Yum!
Sues
They’re beautiful and sound amazing!!
Those look delicious! Love the flecks of color, and it is nice to step outside of pumpkin paradise once in awhile. Yum!
These look amazing! I like that you did a recipe with cranberries…delicious! I have two frozen bags in my freezer calling my name 🙂
What a great idea! I love this flavor combination. I agree that this is the best way to fill a cupcake…I’ve used it a few times now!
These cupcakes look gorgeous! Now I want to order Fiori di Sicilia from KAF. I did so good not letting myself buy it when we were there!
How fun! These cupcakes look delicious.. I don’t know why but I would have never thought about cranberry and cupcakes!?
these sound fabulous, love the flavor combo!!
Great pics! These sound delicious 🙂
For some reason I am not seeing the recipes for the cranberry filling or mousse. Can you help me find them? Thank you!