


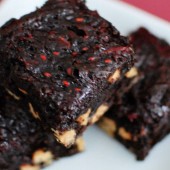
Peanut Butter and Jelly Brownies
I love putting a new spin on a classic recipe. I had the pleasure of enjoying these Peanut Butter and Jelly Brownies when I was hanging out with my friends Fiona, Aimee, and Katie one night a couple months ago. Fiona had whipped up quite the unique recipe. Her recipe involves cutting the brownies in half after they’ve been baked and cooled. When it came right down to it, I was just too lazy to commit to that kind of effort.

I know, it really isn’t that much additional effort, but that’s the decision I made. Instead of following Fiona’s recipe exactly, I decided to just use peanut butter chips in the brownies and top it with jelly, just like Fiona did. The outcome is a great combination of the classic peanut butter and jelly flavors mixed into a brownie. These were a huge hit, as to be expected.

One Year Ago: Pumpkin Cinnamon Rolls and Indian Spiced Beans
Two Years Ago: Cranberry, Caramelized Onion, and Goat Cheese Dip


Peanut Butter and Jelly Brownies
Yield: 16 bars
Ingredients:
1/2 cup (1 stick) unsalted butter
1 cup + 2 Tbsp sugar
2 eggs
1/2 cup + 2 Tbsp cocoa
1/2 tsp salt
1/2 tsp baking powder
1/2 tsp espresso powder, optional
1/2 Tbsp vanilla
3/4 cup flour
1 cup peanut butter chips
1/2 cup red raspberry jelly
Directions:
Preheat the oven to 350°F. Lightly grease a 9x9" pan
In a saucepan set over low heat, melt the butter, then add the sugar and stir to combine. Return the mixture to the heat briefly, just until it's hot, but not bubbling; it'll become shiny looking as you stir it. Heating this mixture a second time will dissolve more of the sugar, which will yield a shiny top crust on your brownies.
Transfer the sugar mixture to a medium-sized mixing bowl, if you've heated it in a saucepan. Stir in the cocoa, salt, baking powder, espresso powder, and vanilla.
Whisk in the eggs, stirring until smooth.
Add the flour and chips, again stirring until smooth.
Spoon the batter into a lightly greased pan.
In another pan or microwave dish, heat the jelly until warm and melted. Spoon warm jelly on top of brownie batter. Use a knife to swirl around to mix into brownies.
Bake the brownies for about 30 minutes, until a cake tester inserted into the center comes out clean, or with just a few moist crumbs clinging to it. The brownies should feel set on the edges, and the center should look very moist, but not uncooked. Remove them from the oven and cool completely prior to cutting.
Recipe adapted from A Boston Food Diary


 I am Jen the Beantown Baker. Engineer by day and baking maven by night. Hubby serves as my #1 fan and official taste tester. We got hitched back in 2006. Barefoot. In the sand. With the waves crashing behind us. It was one of the best decisions we’ve ever made.


I love freezing dough but somehow most ends up in my tummy unbaked when I do that 🙂
What a great gift! I’m thinking that would be wonderful for all sorts of occasions. Thanks for the idea!
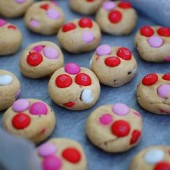
These are adorable and I love that idea! Two questions, though: 1) Were these as good as the cookies from the other recipes? and 2) When you freeze them, do you bake right from frozen?
Great questions Carly – As far as comparing them to the other cookies. I enjoyed the chocolate M&M cookies the best, but they were REALLY chocolatey. The other non-chocolate M&M cookies were a bit more chewy and they had nuts in them, so they had a different vibe. This recipe was more of a classic M&M cookie for sure.
As far as baking from frozen, you can def just go straight from freezer to oven. Bake them ~13 minutes instead of ~11 and take them out when they look done.
these were delicious!
they look so cute all frozen up 🙂
I love the pink and red M&Ms. Thanks for the idea of freezing the cookie dough.
I was going to ask you the same thing as Carly, well the first question. These cookies are cute. Your freezing method reminded me that I have a bunch of sugar cookies still in the freezer! Do you know how long cookies can stay in the freezer?
I don’t know how long they will last in the freezer. I have a tendency to forget about things in my freezer… I’d guess a couple months? Anyone have ideas?
What festive little cookies 🙂 I love them! I also like the fact that you froze them. I bet they were delicious. Make sure to enter the All Through the Year Cheer event for Valentine’s Day 🙂
I think that sounds like a great way to spend valentine’s day. It can be intimidating the way it’s so hyped up. The cookies look very festive, love ’em!
We don’t do “valentine’s day” either since my MIL was born on the 14th and daughter’s birthday is the 15th – besides, its more important to say you love someone everyday, not just one day out of the year. Love the idea about freezing the cookie dough in preshaped form and giving that away. Wonderful idea!
I am looking for cookies that travel well for my soldier adopted through Soldier’s Angels and these look like a winner!!
Mmm, these were so tasty! Happy Valentine’s Day!
These are just too cute!! I love M&M cookies too!!
http://www.singforyoursupperblog.com
Just had to add my two cents on the idea of giving cookie dough frozen and ready to be baked – genius! For some reason, I’ve never thought of that, even though I’ve given cookies frozen to people to be defrosted when they’re ready to eat. I love the dough idea!
YUM-these look absolutely delicious! I love the pink and red M&Ms!